1
2
3
4
5
6
7
8
9
10
11
12
13
14
15
16
17
18
19
20
21
22
23
24
25
26
27
28
29
30
31
32
33
34
35
36
37
38
39
40
41
42
43
44
45
46
47
48
49
50
51
52
53
54
55
56
57
58
59
60
61
62
63
64
65
66
67
68
69
70
71
72
73
74
75
76
77
78
79
80
81
82
83
84
85
86
87
88
89
90
91
92
93
94
95
96
97
98
99
100
101
102
103
104
105
106
107
108
109
110
111
112
113
114
115
116
117
118
119
120
121
122
123
124
125
126
127
128
129
130
131
132
133
134
135
136
137
138
139
140
141
142
143
144
145
146
147
148
149
150
151
152
153
154
| import json
import math
import re
import time
from urllib.parse import urljoin
import requests
from PIL import Image
div_offset = [
{"x": -157, "y": -58},
{"x": -145, "y": -58},
{"x": -265, "y": -58},
{"x": -277, "y": -58},
{"x": -181, "y": -58},
{"x": -169, "y": -58},
{"x": -241, "y": -58},
{"x": -253, "y": -58},
{"x": -109, "y": -58},
{"x": -97, "y": -58},
{"x": -289, "y": -58},
{"x": -301, "y": -58},
{"x": -85, "y": -58},
{"x": -73, "y": -58},
{"x": -25, "y": -58},
{"x": -37, "y": -58},
{"x": -13, "y": -58},
{"x": -1, "y": -58},
{"x": -121, "y": -58},
{"x": -133, "y": -58},
{"x": -61, "y": -58},
{"x": -49, "y": -58},
{"x": -217, "y": -58},
{"x": -229, "y": -58},
{"x": -205, "y": -58},
{"x": -193, "y": -58},
{"x": -145, "y": 0},
{"x": -157, "y": 0},
{"x": -277, "y": 0},
{"x": -265, "y": 0},
{"x": -169, "y": 0},
{"x": -181, "y": 0},
{"x": -253, "y": 0},
{"x": -241, "y": 0},
{"x": -97, "y": 0},
{"x": -109, "y": 0},
{"x": -301, "y": 0},
{"x": -289, "y": 0},
{"x": -73, "y": 0},
{"x": -85, "y": 0},
{"x": -37, "y": 0},
{"x": -25, "y": 0},
{"x": -1, "y": 0},
{"x": -13, "y": 0},
{"x": -133, "y": 0},
{"x": -121, "y": 0},
{"x": -49, "y": 0},
{"x": -61, "y": 0},
{"x": -229, "y": 0},
{"x": -217, "y": 0},
{"x": -193, "y": 0},
{"x": -205, "y": 0}
]
def recover_pic(pic_path, new_pic_path):
unordered_pic = Image.open(pic_path)
ordered_pic = unordered_pic.copy()
for i, d in enumerate(div_offset):
im = unordered_pic.crop((math.fabs(d['x']), math.fabs(d['y']), math.fabs(d['x']) + 10, math.fabs(d['y']) + 58))
if d['y'] != 0:
ordered_pic.paste(im, (10 * (i % (len(div_offset) // 2)), 0), None)
else:
ordered_pic.paste(im, (10 * (i % (len(div_offset) // 2)), 58), None)
ordered_pic.save(new_pic_path)
def download_pic(store_name):
headers = {
'Accept': 'application/json, text/plain, */*',
'Accept-Language': 'zh-CN,zh;q=0.9',
'Cache-Control': 'no-cache',
'Connection': 'keep-alive',
'Content-Type': 'application/json',
'Origin': 'https://www.tianyancha.com',
'Pragma': 'no-cache',
'Referer': 'https://www.tianyancha.com/',
'Sec-Fetch-Dest': 'empty',
'Sec-Fetch-Mode': 'cors',
'Sec-Fetch-Site': 'same-site',
'User-Agent': 'Mozilla/5.0 (Macintosh; Intel Mac OS X 10_15_7) AppleWebKit/537.36 '
'(KHTML, like Gecko) Chrome/112.0.0.0 Safari/537.36',
'X-TYCID': '70c68810ddbd11eda0a455532f9618b6',
'sec-ch-ua': '"Chromium";v="112", "Google Chrome";v="112", "Not:A-Brand";v="99"',
'sec-ch-ua-mobile': '?0',
'sec-ch-ua-platform': '"macOS"',
}
params = {
'_': '1683799958183',
}
response = requests.get('https://napi-huawei.tianyancha.com/validate/init', params=params, headers=headers)
resp = json.loads(response.text)
data = json.loads(resp['data'])
gt = data['gt']
challenge = data['challenge']
headers = {
'Accept': '*/*',
'Accept-Language': 'zh-CN,zh;q=0.9',
'Cache-Control': 'no-cache',
'Connection': 'keep-alive',
'Pragma': 'no-cache',
'Referer': 'https://www.tianyancha.com/',
'Sec-Fetch-Dest': 'script',
'Sec-Fetch-Mode': 'no-cors',
'Sec-Fetch-Site': 'cross-site',
'User-Agent': 'Mozilla/5.0 (Macintosh; Intel Mac OS X 10_15_7) AppleWebKit/537.36 (KHTML, like Gecko) '
'Chrome/112.0.0.0 Safari/537.36',
'sec-ch-ua': '"Chromium";v="112", "Gostiogle Chrome";v="112", "Not:A-Brand";v="99"',
'sec-ch-ua-mobile': '?0',
'sec-ch-ua-platform': '"macOS"',
}
response = requests.get(
f'https://api.geevisit.com/get.php?gt={gt}&challenge={challenge}&product=popup&offline=false&'
f'api_server=api.geevisit.com&protocol=https://&type=slide&path=/static/js/geetest.6.0.9.js'
f'&callback=geetest_{str(round(time.time() * 1000))}',
headers=headers,
)
bg_url = urljoin("https://static.geetest.com/", re.findall("\"bg\": \"(.*?)\"", response.text)[0])
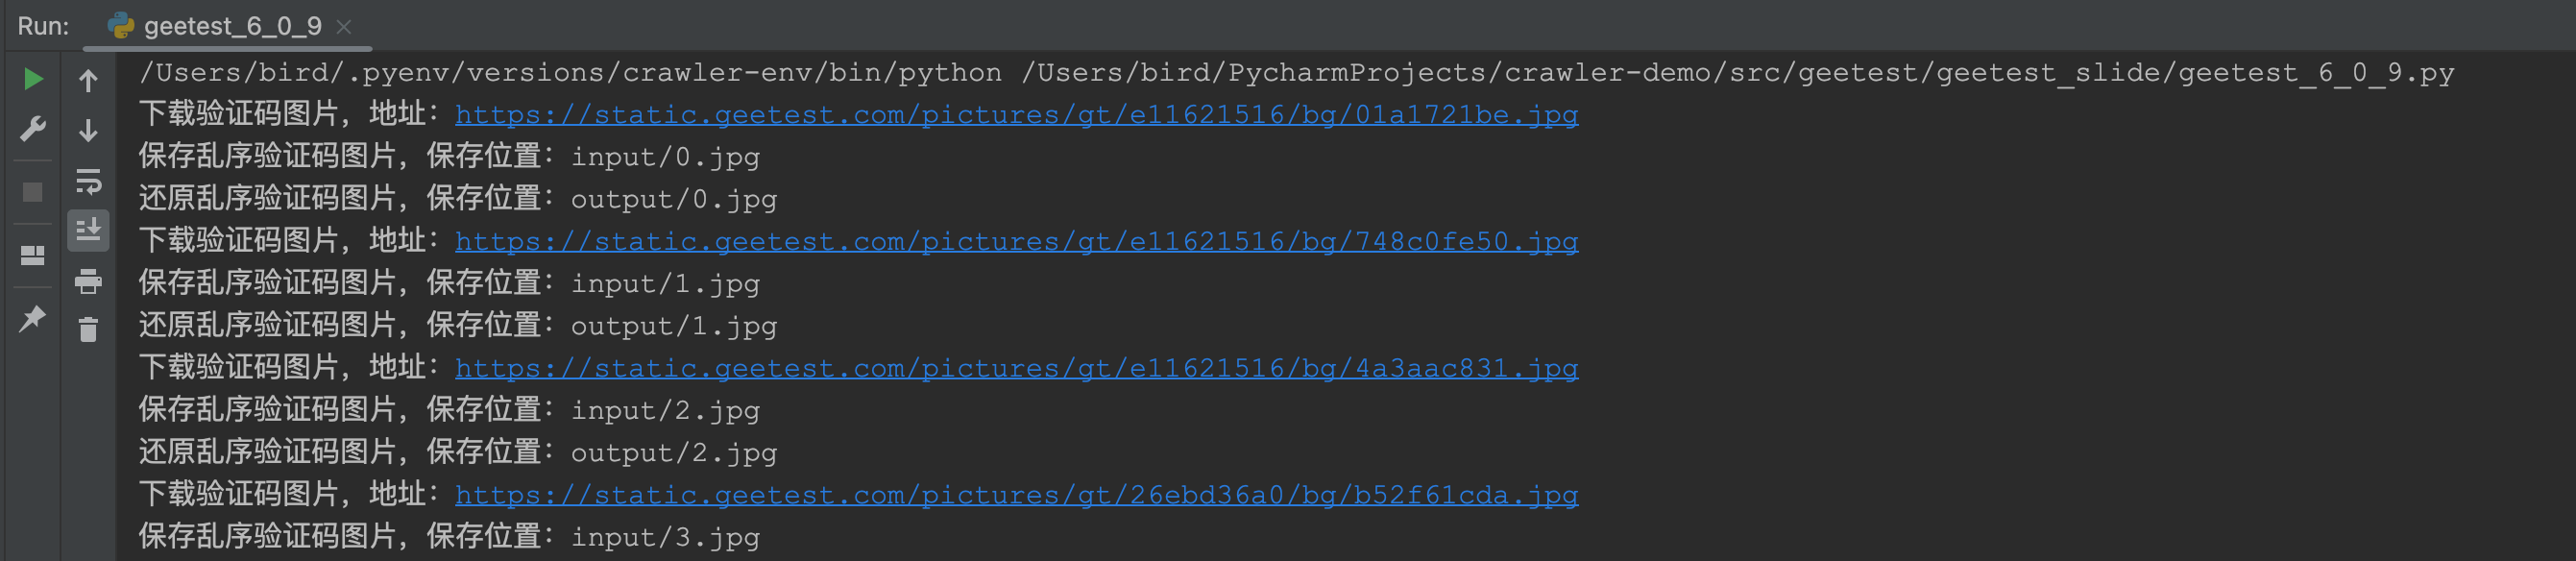
print("下载验证码图片,地址:" + bg_url)
resp = requests.get(bg_url)
with open(store_name, "wb+") as f:
f.write(resp.content)
if __name__ == '__main__':
for i in range(10):
name = "input/" + str(i) + ".jpg"
download_pic(name)
print("保存乱序验证码图片,保存位置:" + name)
new_name = "output/" + str(i) + ".jpg"
recover_pic(name, new_name)
print("还原乱序验证码图片,保存位置:" + new_name)
time.sleep(0.5)
|